[原创][教程] GitHub SSH 生成 + ssh-agent 自动登录 + SublimeGit 支持
11 Dec 2014这是纯属拿来存档的
也给那些用着GitHub的人看看
SublimeGit 是一个合成Sublime 和 Git的Sublime Text Plugin
工具
Git
下载地址:Git for Windows
SublimeGit
下载地址:SublimeGit
PuTTY
下载地址:PuTTY
请选择Windows Installer
SSH Keys
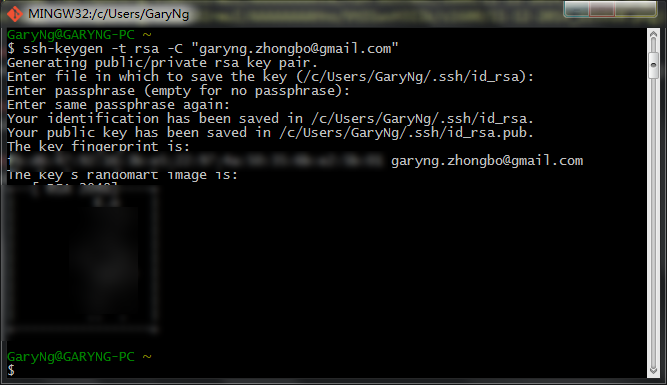
- 打开Git Bash,输入:
ssh-keygen -t rsa -C "<你的EMAIL>"- 按下Enter
- 输入密码
- 重复输入密码:
- 然后就好了:
GitHub 添加 SSH Keys
- 输入
clip < clip ~/.ssh/id_rsa.pub将ssh keys 复制到剪贴板
进入Settings:
然后点击Add SSH Keys
- 输入Title
然后Paste SSH Key
点击Add Key
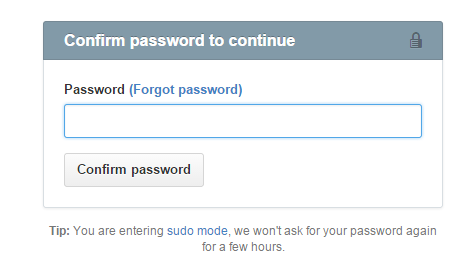
- 输入密码:
测试链接
- 输入
ssh -T git@github.com- 输入yes
按下Enter
- 然后输入密码
设置ssh-agent
- 还是一样打开Git Bash
输入
.touch profile- 输入
notepad .profile以notepad 打开.profile 文件
- 贴入下面的代码:
然后保存
# Note: ~/.ssh/environment should not be used, as it

#       already has a different purpose in SSH.


env=~/.ssh/agent.env

# Note: Don't bother checking SSH_AGENT_PID. It's not used

#       by SSH itself, and it might even be incorrect

#       (for example, when using agent-forwarding over SSH).


agent_is_running() {
    if [ "$SSH_AUTH_SOCK" ]; then
        # ssh-add returns:

        #   0 = agent running, has keys

        #   1 = agent running, no keys

        #   2 = agent not running

        ssh-add -l >/dev/null 2>&1 || [ $? -eq 1 ]
    else
        false
    fi
}

agent_has_keys() {
    ssh-add -l >/dev/null 2>&1
}

agent_load_env() {
    . "$env" >/dev/null
}

agent_start() {
    (umask 077; ssh-agent >"$env")
    . "$env" >/dev/null
}

if ! agent_is_running; then
    agent_load_env
fi

# if your keys are not stored in ~/.ssh/id_rsa.pub or ~/.ssh/id_dsa.pub, you'll need

# to paste the proper path after ssh-add

if ! agent_is_running; then
    agent_start
    ssh-add
elif ! agent_has_keys; then
    ssh-add
fi

unset env
重新打开Git
如果要求输入密码
那就完成了:
SublimeGit 设置
添加环境变量 GIT_SSH
Sublime Text 必须已经安装SublimeGit 插件
- 到PuTTY Download Page下载Putty Installer 安装
- 添加环境变量:GIT_SSH
指向putty 的 plink 程序 (通常在C:\Program Files\PuTTY下)
右键点击Computer
点击Properties
- 然后点击Advanced system settings:
- 然后点击Advanced
然后在点击Environment Variables…
点击New..
- Variable name 输入
GIT_SSH
Variable value 输入C:\Program Files\PuTTY\plink.exe (依据plink的位置而定)
点击OK
- 回到列表上
点击Path
点击Edit
- 在后尾追加
;C:\Program Files\Git\bin;
点击OK
再点击OK
然后再点击OK
OpenSSH 私钥转PuTTY私钥(*.ppk)
- 打开PuTTYGen
点击Load
- Filter换成All Files(.)
选择没有扩展名的id_rsa
点击Open
- 输入密码:
然后点击OK
- 点击OK
- 换个Key Comment
然后点击Save Private Key
- 保存为
id_rsa.ppk
- 关闭PuTTYGen
获取GitHub 的 Public Key
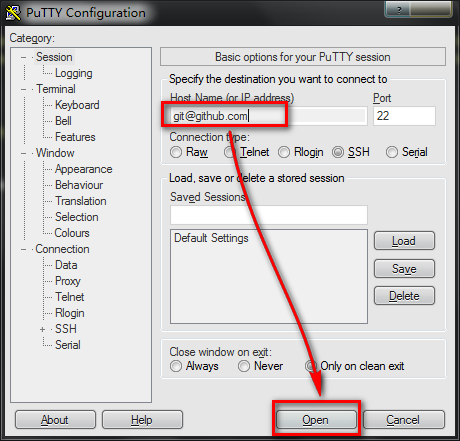
- 打开PuTTY
Host Name填入git@github.com
点击Open
- 点击Yes
- 点击OK
- 关闭PuTTY
设置Pageant
- 打开Pageant所在的文件夹 (Program Files 下)
- 在Pageant 上右键
选择Create Shortcut
- 点击Yes
- 到Desktop
找到Pageant 的 shortcut 图标
右键点击
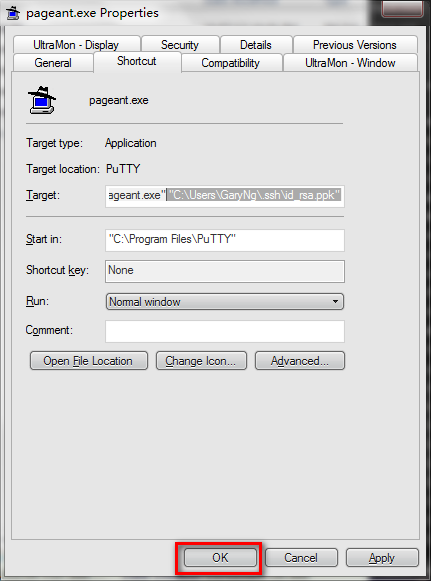
选择Properties
- 在Target 后尾追加 .ppk 的位置
这里是"C:\Users\GaryNg\.ssh\id_rsa.ppk"
点击OK
- 打开Startup 文件夹
位于%appdata%\Microsoft\Windows\Start Menu\Programs\Startup
将pageant.exe 的shortcut 拖入其中
这样下次开机就会直接帮你登录GitHub的SSH
- 双击开启pageant
输入密码即可
SublimeGit 测试
注意:https协议不能哦
Published by Gary Ng


