[教程][原创] Cheat Engine 6.4 Tutorial —— 闯关教程 #3
17 Dec 2014教程 #1: [教程][原创] Cheat Engine 6.4 Tutorial —— 闯关教程 #1
教程 #2: [教程][原创] Cheat Engine 6.4 Tutorial —— 闯关教程 #2
看完然后了解了才看这一篇哦
其实到Step 5 就可以应付很多种类的游戏了
掌握了Code Finder 和一点点ASM 就可以应付很多游戏了
当然坚持下去会更好 (N年前我也只到Step 5 罢了,最近玩玩CE才想到这个CE Tutorial 的)
注意:这篇文章的内容可能会导致PHD(Permanent Head Damage)
Step 6
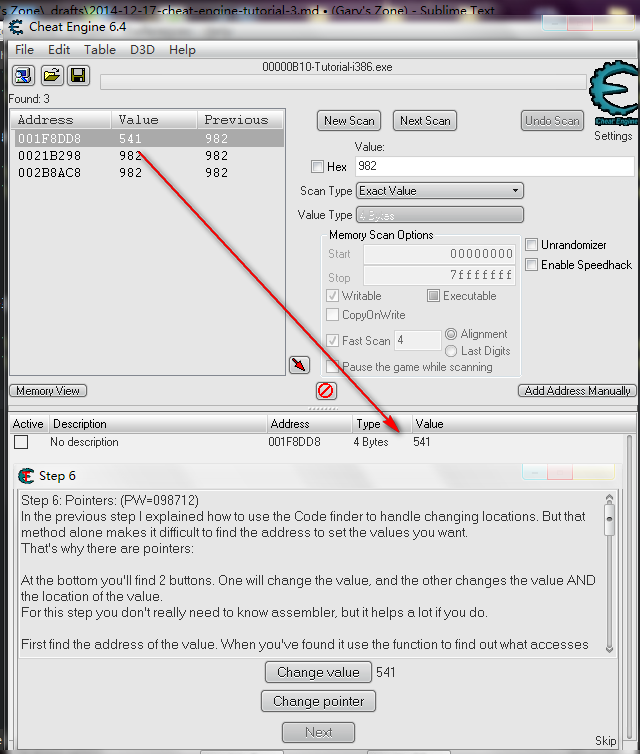
Step 6: Pointers: (PW=098712) In the previous step I explained how to use the Code finder to handle changing locations. But that method alone makes it difficult to find the address to set the values you want. That’s why there are pointers:
At the bottom you’ll find 2 buttons. One will change the value, and the other changes the value AND the location of the value. For this step you don’t really need to know assembler, but it helps a lot if you do.
First find the address of the value. When you’ve found it use the function to find out what accesses this address. Change the value again, and a item will show in the list. Double click that item. (or select and click on more info) and a new window will open with detailed information on what happened when the instruction ran. If the assembler instruction doesn’t have anything between a ‘[’ and ‘]’ then use another item in the list. If it does it will say what it think will be the value of the pointer you need. Go back to the main cheat engine window (you can keep this extra info window open if you want, but if you close it, remember what is between the [ and ] ) and do a 4 byte scan in hexadecimal for the value the extra info told you. When done scanning it may return 1 or a few hundred addresses. Most of the time the address you need will be the smallest one. Now click on manually add and select the pointer checkbox.
The window will change and allow you to type in the address of a pointer and a offset. Fill in as address the address you just found. If the assembler instruction has a calculation (e.g: [esi+12]) at the end then type the value in that’s at the end. else leave it 0. If it was a more complicated instruction look at the calculation.
example of a more complicated instruction: [EAX*2+EDX+00000310] eax=4C and edx=00801234. In this case EDX would be the value the pointer has, and EAX*2+00000310 the offset, so the offset you’d fill in would be 2*4C+00000310=3A8. (this is all in hex, use calc.exe from windows in scientific mode to calculate)
Back to the tutorial, click OK and the address will be added, If all went right the address will show P->xxxxxxx, with xxxxxxx being the address of the value you found. If thats not right, you’ve done something wrong. Now, change the value using the pointer you added in 5000 and freeze it. Then click Change pointer, and if all went right the next button will become visible.
extra: And you could also use the pointer scanner to find the pointer to this address
主界面:
之前我们找到的地址呢,他们都是直接储存一个特定的value的
就拿之前的比喻来说(内存是条街,地址是门牌,value储存在屋子里),我们找到的门牌(地址)对应一间屋子对吧?
打开门一看,恩,里面有一个人(可以说是这间“屋子”的主人),脸上写着“我是100”(这个就是地址储存的值)
差不多就是这样 (献上超级无敌没有艺术的画,伤眼慎入!)
你敲00000006的门,没人回应,这时你仔细一看,门上贴了一张纸,上面写着:
找屋主请到门牌
00000004
然后你就到00000004那里,屋主的脸上写着12398
然后你就知道了门牌00000006只有一个指示牌表示屋主在00000004那儿
这个换到内存中呢,这种情况就叫做指针(Pointer)
简单来说就不直接的储存真正的value,但是却储存value储存的地址
就像之前前一篇的ASM基础教程那般[eax]其中的eax就是一个pointer
有理解到么?
有接到我的线么?
没有?
哭、泪奔….(还是看不懂请到这里来:点击我)
现在呢界面上有两个按钮,一个是Change Value 另外一个呢是Change Pointer
Change Value 应该不用解释了吧?就是改变value呗
Change Pointer 呢,就是“屋主搬家”呗
用之前的比喻说,本来的状况是这样的:
然后点击Change Pointer 过后呢,就变成了这样:
直白么?
记得:第一步骤一直都是找出value的地址
然后就找出什么access或者write这个地址(就是Step 5 之中用到的Code Finder的功能)
先试试access的:
点击Change Value 之后
这里的列表项目有一点点多,从这些项目当中,我们要找出有储存pointer的地址
在这个图片当中,00000006就是一个指向00000003的指针(Pointer)
如果有一个指针eax,里面的值储存的是00000003的话
那么从之前的ASM基础教程我们知道,[eax] 就会是储存在00000003之中的值(也就是12398)
更简单点来说
你要门牌 00000003之中的值的话,你可以有两种方法
- 直接读取:就是从
00000003之中读取值 - 用指针读取:比如说地址
00000006储存的值是00000003,你就可以从这个指针获得00000003的值(使用指针的方法依据你使用的语言而不同,在ASM中就是[寄存器],C似乎中是*<变量名>等等)
先不先说如何找出Pointer地址,先来看看Step 6 要我们做啥:
Now, change the value using the pointer you added in 5000 and freeze it. Then click Change pointer, and if all went right the next button will become visible.
就是要我们将value 冻结(Freeze)在5000呗
你可能会想:我都找到Value 的地址了,我直接freeze不能么?
如果是Change Value 的话呢,这个办法是可行的
但是,里面写明了Then click **Change pointer** 就行不通了
为什么?
还是用一堆丑陋的图来解释吧 xD
现在我们有Value 的地址了(在这里是00000003),然后我们在Cheat Engine 里面Freeze 着
但是我们点击Change Pointer 过后呢,指针就会指向别的地址,而且那个地址是是还没后Freeze的,那样还是可以改变Value 的值
那到底要怎么样才能Freeze 着 Value 呢?
非常简单!就是直接freeze 着pointer:
那样也不能改变Pointer的值啦
现在回到CE的界面吧
列表上面有N多个项目,到底哪个才是改变value的代码呢?
先想想,架设指针eax指向地址00000003,而ebx里面储存的是100
那么要将地址00000003的值换成ebx的值的ASM代码就会是 mov [eax],ebx
看回去列表,找找类似的代码:
我们看到了 mov [edx],eax
双击就会跳出一个Extra Info :
eax的值26E(16进制)正好是10进制的622
那么我们知道edx就是一个pointer啦
现在将找到的地址复制起来吧
右键点击Extra Info 那一行文字 (The value of the pointer...)
然后点击Copy easy guess to clipboard
其实呢除了find out what access this address 呢,find out what writes to this address 其实有时候会比较容易一点:
搜索出来的代码还是一样的
现在我们就要找出pointer 的地址
以这个图来说:
我们找到的只是12398的地址00000003
现在我们要做的就是找出储存00000003的地址(也就是00000006)
如何找呢?就是直接将地址00000003当成值来找
找出储存00000003的地址!
记得之前复制了的pointer address吧?(笔者这边是:001F8E08)
现在回到CE,点击New Scan
然后勾上Hex,再paste 入刚才复制起来的值,然后就点击First Scan:
然后你就会看到列表之中唯一一项(如果很多项的话,通常都是那个Address比较小的):
现在就找到了pointer 的 address 了
先点击Add Address Manually
然后勾取Pointer:
输入找到的Address:
点击OK后,在下方的列表中你就会看到新添加的项目的Address是以P->开头的
然后value 呢就是之前我们找到的value
点击Change value 的话,两个项目的value也会跟着一起改变(如果没有改变的话,就代表你找到的pointer 的 address 是错滴)
现在呢,狠狠的将pointer 的 value 换成 5000 然后 freeze 起来吧!
回到CE Tutorial 的界面
点击Change Pointer
嘿嘿 再狠狠的点击Next 按钮吧
Published by Gary Ng


